In this comprehensive guide, we delve into the world of Briggs and Stratton carburetors, your trusty sidekick in maintaining powerful and efficient small engines. From cleaning techniques to rebuilding strategies, we’ve got you covered!

Briggs and Stratton Carburetor Troubleshooting Guide
Don’t let carburetor problems put a damper on your engine’s performance. Here’s a handy troubleshooting guide that highlights common issues, their symptoms, and how to address them effectively.
Engine Won’t Start or Runs Poorly After Starting: This could be a sign of a clogged carburetor. Often, old fuel left in the engine from the previous season becomes thick and can clog the carburetor. Cleaning the carburetor and using a carburetor-specific cleaner can often fix this issue.
Engine Stalls, Surges, or Backfires: This could be caused by an incorrect mixture of air and fuel. Check and adjust the carburetor settings. Also, ensure the air filter is clean and functioning correctly.
Black Smoke from Exhaust: This could be a sign that the fuel mixture is too rich, meaning it has too much fuel and not enough air. This could be caused by a dirty air filter, a malfunctioning choke, or a problem with the carburetor itself. Check these components and clean or replace them as necessary.
Which Briggs and Stratton Carburetor Rebuild Kit to Use?
Choosing the right rebuild kit can be challenging. We’ll help you choose the perfect kit, taking into consideration your specific carburetor model and the tasks you want to perform.

How to Adjust the Float in a Briggs and Stratton Carburetor?
Float adjustment can greatly affect your engine’s performance. Here, we’ll provide a detailed guide on how to get the float adjustment just right.
- Disconnect the Spark Plug: Start by ensuring your engine is off and cool. Disconnect the spark plug for safety.
- Remove the Carburetor: Detach the air filter to expose the carburetor. You’ll need to disconnect the fuel line, and throttle linkage, and remove the mounting bolts to take off the carburetor. Be careful with the fuel line as fuel may spill.
- Remove the Float Bowl: The float bowl is usually located at the bottom of the carburetor. Remove the bolt at the bottom of the float bowl and gently remove it. The float and a needle-like component, which is the float valve, should now be visible.
- Check the Current Float Level: Before making any adjustments, check the current float level. It should be parallel to the carburetor body when the carburetor is held upside down. If it’s not parallel, it needs adjustment.
- Adjust the Float Level: If adjustment is needed, gently bend the small metal tab on the float that pushes against the float valve. Bend it upwards to lower the float level (making the mixture leaner), or downwards to raise the float level (making the mixture richer).
- Reassemble the Carburetor: Once the float level is adjusted, clean the float bowl, then reattach it to the carburetor. Reinstall the carburetor, reconnect the fuel line and throttle linkage, replace the air filter, and reconnect the spark plug.
- Test the Engine: Start your engine and allow it to run for a few minutes. Watch for signs of flooding or stalling, and listen for smooth, even running. If necessary, make further adjustments.

How Often Should I Clean or Rebuild a Briggs and Stratton Carburetor?
Regular maintenance is key for optimal engine performance. We’ll provide guidelines on cleaning and rebuilding schedules based on industry standards and practical experience.
- Find the Model Number: Briggs and Stratton’s engines usually have their model numbers stamped on the blower housing or rewind starter. Look for a series of numbers and letters printed or stamped on the metal. The model number usually contains two to four sections: a series of letters and numbers, then a dash, followed by more letters and numbers, and sometimes an additional set of letters. For example, it might look like “12345-6789-01”.
- Decode the Model Number: The first two to four digits usually represent the basic engine type. The next two to four digits often indicate the model series and the application. The last two digits, after the dash, generally indicate the engine’s design revision.
- Refer to Briggs and Stratton Manuals or Online Tools: Once you’ve found and decoded your model number, you can cross-reference this information with Briggs and Stratton’s extensive library of manuals and parts lists, or use online tools provided by Briggs and Stratton. By entering your model number into the search function, you should be able to identify the exact carburetor model that corresponds to your engine.
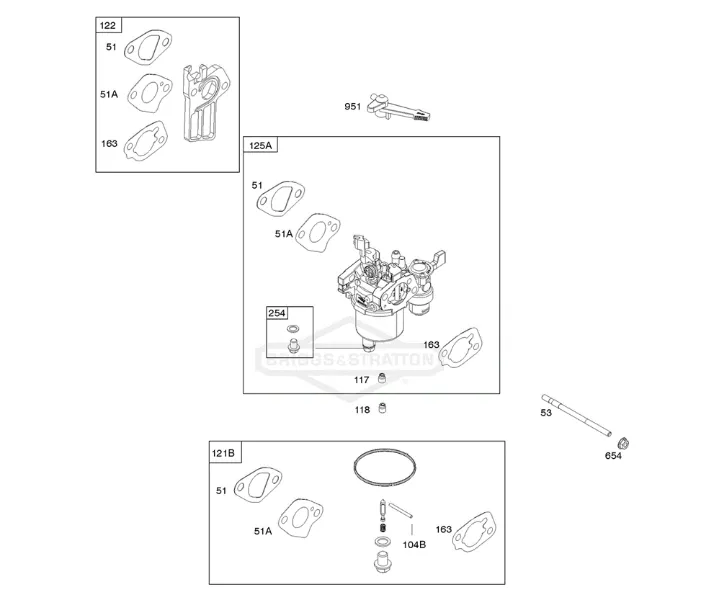
Briggs and Stratton Carburetor Identification Guide
Identifying your carburetor model is crucial for obtaining the right parts and instructions. We’ll show you how to do it accurately and easily.

How to Tune a Briggs and Stratton Carburetor for Better Fuel Efficiency?
Fuel efficiency is a significant aspect of engine performance. We’ll teach you how to tune your carburetor to enhance fuel efficiency and reduce operating costs.
Materials Needed:
- Screwdriver
- Clean cloth
- Carburetor cleaner
Steps:
- Prepare the Engine: Start your engine and allow it to run for about 10 minutes to reach its operating temperature. This will allow for more accurate adjustments.
- Locate the Carburetor: Identify the carburetor on your engine. It’s usually located near the top of the engine, connected to the air filter and fuel line.
- Identify the Adjustment Screws: Briggs and Stratton’s carburetors typically have two adjustment screws: the idle speed screw and the idle mixture screw. The idle speed screw is often set into the throttle lever, while the idle mixture screw is typically found near the base of the carburetor.
- Adjust the Idle Speed Screw: Turn the idle speed screw clockwise to increase engine speed, and counter-clockwise to decrease. Adjust this until the engine is idling at a speed that’s fast enough to keep it running but slow enough to reduce fuel consumption. For most engines, this is about 1,750 RPM.
- Adjust the Idle Mixture Screw: The idle mixture screw controls the amount of fuel that goes into the engine during idle. Turn this screw slowly clockwise until the engine speed decreases. Then, slowly turn it counter-clockwise until the engine speed increases and then begins to decrease again. The optimal point is usually at the peak speed before it starts to decrease.